The network printer only works with a network connection via an Ethernet cable, not with WiFi!
Contact your IT support team to set up the correct network connections in your office.
Here are the network printer settings for each of the HFBK's three buildings:
The
network printer will not work with WIFI, pls make sure you are
connected with ethernet cable.
Printer Model: Canon imageRUNNER ADVANCE DX
C5840i
Lerchenfeld
Hostname: canon-dxc5840.hfbk.org
Location: LE2 R113 - 1st floor
Printer Model Canon Image Runner DX529i
Finkenau 42
Host name:
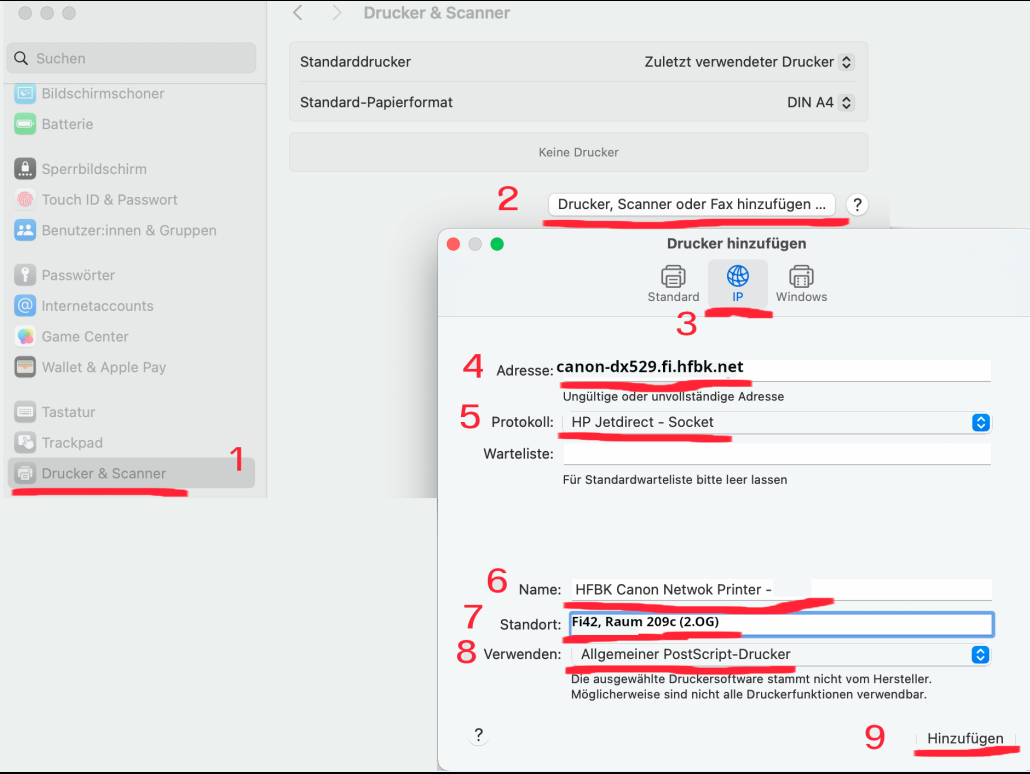
canon-dx529.fi.hfbk.net
Location: Fi42 Raum 209c (2.OG)
Wartenau
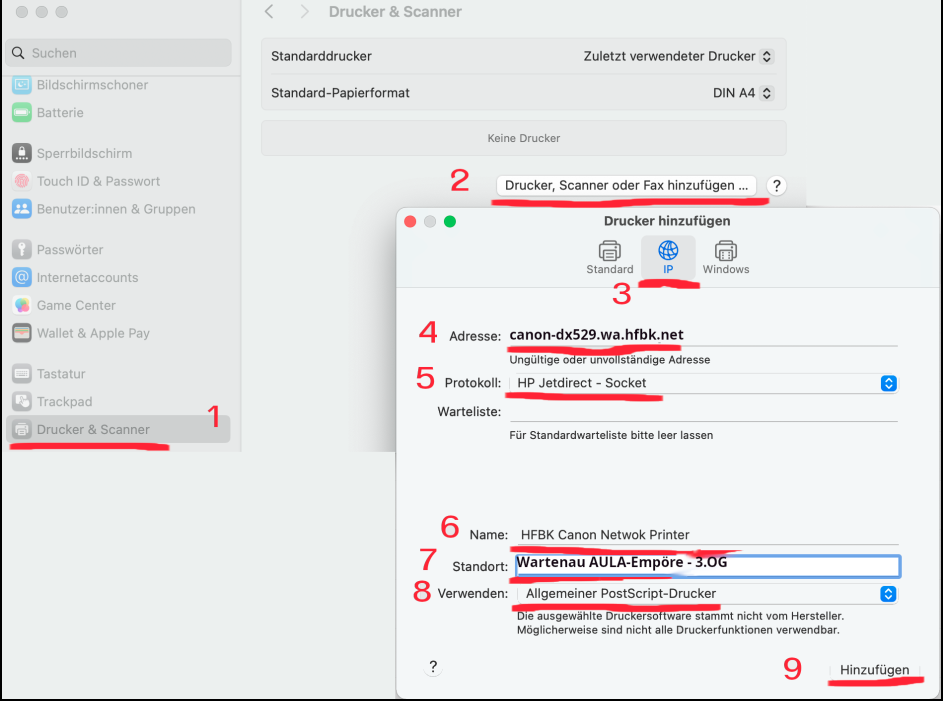
Hostname: canon-dx529.wa.hfbk.net
Location: Wartenau AULA - 3rd floor
To set up the printers, please enter the correct settings based on your operating system:
- setup the network printer settings
- enter the network address of the corresponding printer (see above)
- we recommend to use HP Jet direct protocol
- You can provide your desired printer name
- You may need to download the printer driver from the Rico website.
Printer Model: Canon imageRUNNER ADVANCE DX
C5840i in Lerchenfeld 2 R.113
Printer Model Canon Imagerunner Advance DX529i in Finkenau 35 and Wartenau 15 Aula
MacOS X:
Add printer to the list of available printers: Choose "Apple" > "System Settings" and click on "Printers & Scanners". Click on "Add" at the bottom of the list of printers. Click on "IP" and enter the information needed for your printer.
For Lerchenfeld 2:
For Finkenau 42
For Wartenau 15:
Windows 10:
1. Open the Windows Start menu. This is the button in the bottom left corner of your screen that is shaped like the Windows logo.
2. Then click to Settings. This is the gear-shaped icon just above the power button in the Start menu.
3. Then click on Devices.
4. Next, select Printers & Scanners. You can find this in the left sidebar.
5. Then click Add a Printer.

6. Click “The printer that I want isn’t listed.” Once you select this, the “Add Printer” screen will pop up.
Choose “Add a local printer or network printer with manual settings,” and click next.
8. Click on “Create a New Port” and select Standard TCP/IP from the drop-down box.
9. Type in your printer’s IP address or URL (see the list above) and click next. At this point, your computer
will try to detect the TCP/IP port. This might take some time.
10. Select the appropriate device type. Use one of the following methods to identify/install the appropriate printer driver:
-
In the drop-down menu for Standard Device Type, select the
device type that corresponds with your printer brand. For example, if
you have a Canon printer, choose either Canon Network Printer or Canon
Network Printing Device. Windows will then detect the driver model. You
will notice that once it detects the driver, your printer will be added
to the list of devices in the Printer & Scanners menu.
- Download the driver.
for Printer Model: Canon imageRUNNER ADVANCE DX
C5840i in Lerchenfeld 2 R.113
Printer Model Canon Imagerunner Advance DX529i in Finkenau 35 and Wartenau 15 Aula
11. Set up optional preferences. Type a printer name if you want to.
Otherwise, click Next. In the next window, do not set up set up
printer sharing. Once
done, click on Next.
12. Print a test page. You will get a message that you have
successfully set up the printer. From here, you can print a test page or
click on Finish.
Linux Ubuntu:
Under "Settings" select Printer and click
'Add' and enter the web address in the search box at the bottom. The
printer should show up after entering the address. Now select "Jet
Direct Printer". Then select the appropriate printer driver.
Contact:
Site access: Please contact hfbk-hausservice@hfbk.hamburg.de to give the access-rights to your HFBK Transponder, -204
https://www.ricoh.de/support/index.htmlhttps://www.ricoh.de/support/index.html